Why I Chose Gardyn
Many years ago, I took my first trip to Florida to visit Disney World. I absolutely loved it and my favorite park was Epcot. In the very middle of the park, they have an exhibit called Living with the Land. It was a leisurely boat ride through a dirt-less, indoor garden. I was amazed to see plants growing with bare roots exposed and just a mist of nutrient-rich water being periodically sprayed on them. The plants were lush and prolific. It was the freshest fruits and vegetables I’ve ever seen which supplied me with a lasting memory.
I’ve always been an avid gardener and strive to do so organically. It’s a hobby that brings me a lot of joy and happiness. Unfortunately, it can be difficult at times to keep the pests away. Recently, I planted peas and when I went to check on them the next few days, there was a hole in the dirt the exact size of the seed. Apparently pill bugs had devoured the seed before they could even sprout. Then my lettuce plants got chomped on by little green worms. Yuck! Sorry guys but I’m not interested in sharing. This tends to happen frequently with my more delicate plants and if you buy lettuce from the store, your lucky if it lasts a week before going bad. I just hate wasting food.
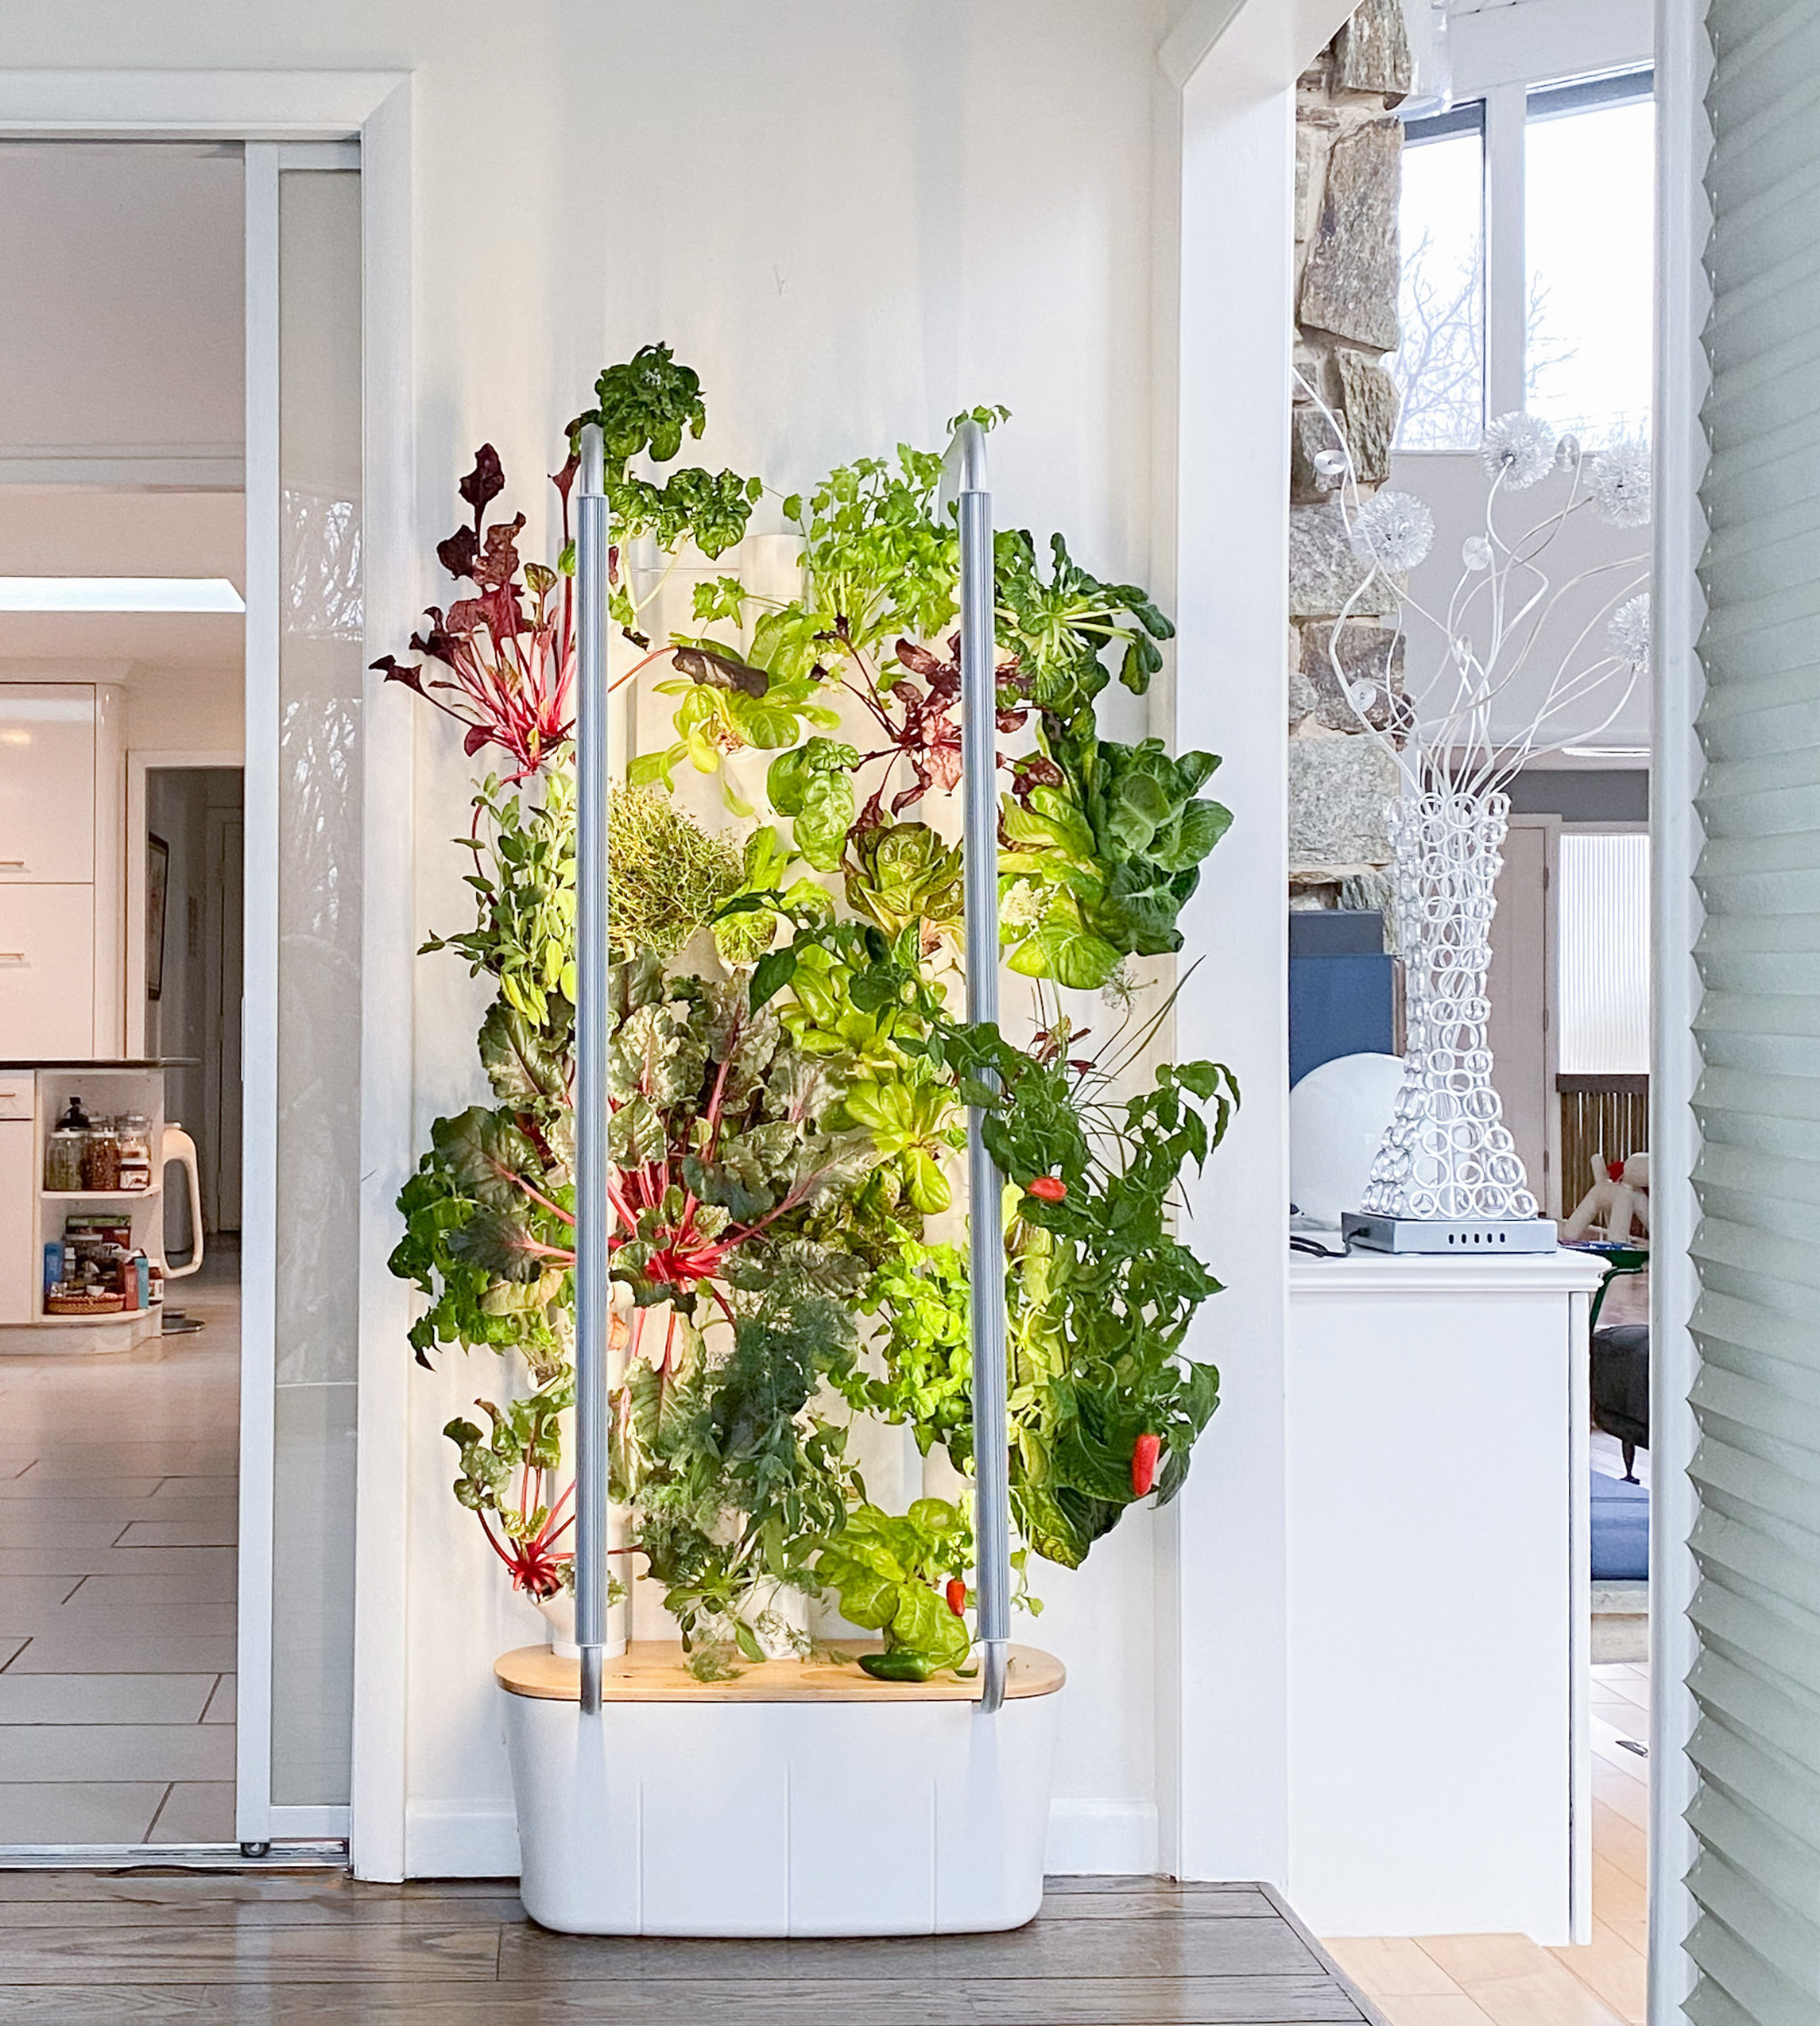
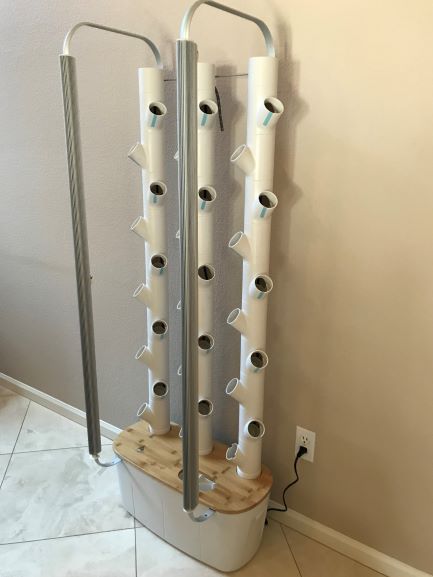
So, the notion has been bouncing around in my mind and I recently decided to try indoor gardening. My plan was to put the more delicate veggies such as lettuce, herbs and greens into the indoor garden and use my outside garden for the more hardy plants such as corn, tomatoes, cucumbers, etc. I researched many different indoor garden brands and decided on a system called Gardyn. The system is compact in size at about 2 feet wide, 5 feet tall and 1 foot deep. It sits on a water reservoir with a nice bamboo top (very ascetically pleasing). A pump takes the water up to the top and drips it down onto each plant on a timed schedule. It has LED grow lights that are also on a schedule for optimal plant growth. Gardyn comes with an App to control the system and has an AI assistant called Kelby keeping an eye on your plants through two camera’s attached to the grow lights. There is actually a computer inside the system which gets hooked up to WiFi so you can see your plants, control the lights and control the water remotely in the App. My Gardyn arrived yesterday so let me take you on a little journey while I record my experience with you…
Where to Purchase, What's the Cost and What's my Return on Investment?
Before you purchase, I recommend doing your research on the different hydroponic systems available. There are many! You will want to pick the system that works for your particular needs and your price range. There are some smaller and more affordable units such as the Aerogarden and there are other similar systems to Gardyn such as iHarvest. It was a hard decision but I chose Gardyn because of the more automated features it has. I am completely new to hydroponic growing (or hybriponic as they call it) and felt that the free 30-day AI assistance included in the purchase would help me to get more familiar with growing in this type of system.
Another valuable tool is to determine what your return on investment (ROI) will be if you end up making a purchase. You can review your grocery receipts to determine your average weekly spend on produce. Be aware…you can not grow any root vegetables with a hybriponic system such as Gardyn and you certainly aren’t going to be growing an apple tree so don’t count the price of produce that you can’t grow on the system. I totaled mine at approximately $15.50 per week. Take the price of the unit divided by your weekly produce spend in order to calculate the number of weeks it will take to pay for your unit. Mine was $684/$15.50 = 44 weeks. That’s less then 1 year and after that, I’ll be actually saving money on produce!
If you have interest in this Gardyn system, it can be purchased through Amazon but I’m going to direct you away from that and suggest ordering directly through the Gardyn website for a couple reasons:
- Amazon and the Gardyn website with their added coupon, are the same price of $699 right now but shipping through Amazon is projected at 14 days for delivery. I got my Gardyn in 5 days from the Gardyn website.
- I have a coupon code for $100 off on the Gardyn website bringing the price to $699 which right now matches Amazon and Gardyn’s price. Sometimes throughout the year, they give customers a better deal that we can pass on to friends and family but that better deal ($200 off) expired on 12/13/2020. I will update this blog if there is a better special later.
Coupon Code: LittleGardenGirl
From Order to Shipment
Once I put in my order for Gardyn, I got an email right away letting me know they received my order. A welcome email from the Gardyn founder came a few days later letting me know my package had shipped and included helpful details before it’s arrival. I was informed it would ship in two packages, what the packages had in them and some initial instructions. My next email was a tracking number for my package from FedEx and my unit arrived within 5 days. I put in the order on Sunday and it was here by Friday. Again, Amazon showed a delivery date of 2-3 weeks.
What's Included?
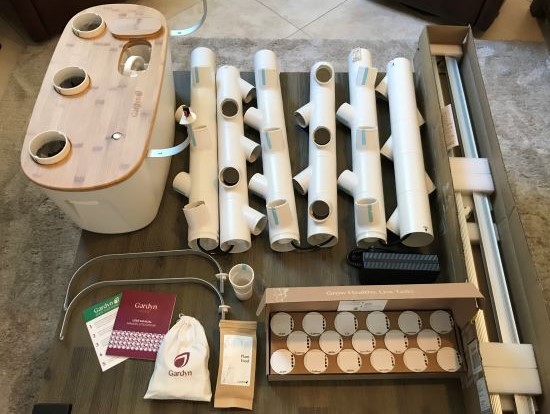
The main package included:
- Instruction manual and quick start guide
- Water reservoir with bamboo top
- 3 planting columns with tubing
- Tools, hardware and accessories bag
- Plant food
- 30 yCubes with a variety of seeds
- Power cord
- 2 light holders and 1 stabilizer bar (not shown)
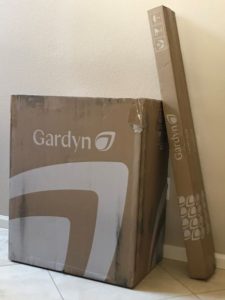
The tall skinny package contained the 2 grow lights.
Setting Gardyn Up
Instruction Manual:
The user manual was very easy to follow and the setup went smoothly except for a few steps that I found a bit more difficult. I will share what I learned so you don’t struggle as I did. All the tools you need to set Gardyn up are included in your shipment. However, I highly recommend you have needle nosed pliers handy. HIGHLY RECOMMEND!! Read on to see why…
Installing the Unit:
- Step 1: Unboxing the unit took about 10-15 minutes. Everything was boxed up very well and the quality of the product looked great..
- Step 2: Connecting the columns together was very easy. You just set, twist to lock and set aside for later installation.
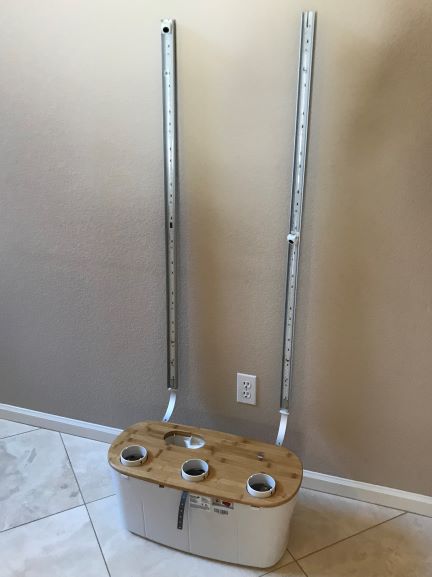
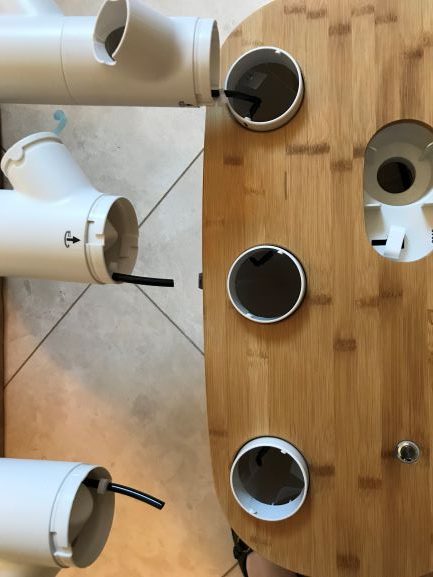
- Step 3: Installing the bamboo top onto the reservoir and lowering the pump into the tank took no time. I was a little confused about how to lower the pump at first but realized I just needed to take out a little foam plug to be able to release the leaver down. There are locking handles for the lid on the side of the water reservoir.
- Step 4: Attaching the LED grow lights to the metal blades on the water reservoir was a bit more difficult. I tipped the reservoir on it’s side per instructions. I was trying to do this from the floor, that meant being on hands and knees. If you have a large table, it might be much easier to navigate this step at waist level. The connectors are very small and they don’t have a lot of slack so it was a bit hard to maneuver. Once connected, you insert the connectors into the center of the light column while also inserting the light onto the lower blade. I was installing this by myself so found this step moderately hard because there is a curve to the blade making it awkward to get the lights at the correct angle to push them in. It would have been much easier if I had someone helping for this task. But hey, I got it done!
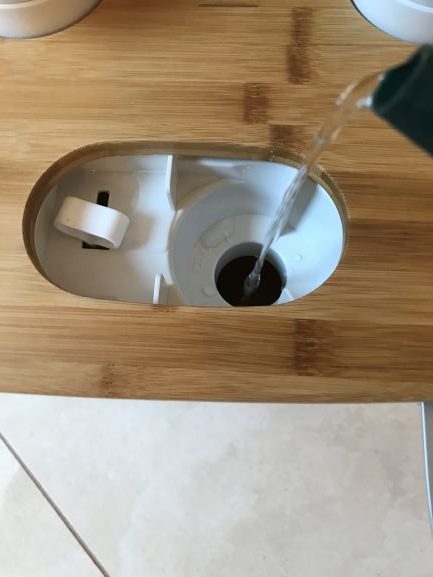
- Step 5: After attaching the lights, it’s time to attach the columns to the reservoir. This was the other step that I found pretty difficult. There wasn’t a lot of slack on the tubing and I could not push the tubing onto the elbow connector inside the reservoir for the life of me. I almost gave up. This is where the pliers saved me. I suggest holding the elbow connector with pliers so you can push and wiggle the tubing on. You will need to press the tubing all the way on the connector or you might have leaks and/or water not reaching the top of the column.
- Step 6: The last thing was installing the upper blades, the stability bar and putting the plants in the system.
- Note: Overall, I felt it was pretty easy to install except for just a few challenging steps. I spend a little over an hour putting it together.
Filling the Unit:
Once the unit is set up, you will need to fill the reservoir with water. Once it’s filled, it’s time to turn it on. It won’t initially make any sounds but rest assured, the computer inside is booting up. Beware! The instructions tell you to use tap water but if you have a water softener, you will need to use purified water so the salt doesn’t effect your plants. In addition, there are strict instructions not to add the plant food until day 10. Seedlings need to start in pure water before you add any food or it can inhibit their ability to sprout.
Installing the Gardyn App and Connecting to WiFi:
Once you turn on your Gardyn, it’s time to install the Gardyn App and connect to your WiFi. It took me 2 attempts to connect. I first tried to connect while I was right next to my Gardyn. For some reason it failed but connected just fine when I moved next to my router. I understand that other customers have had issues connecting but Gardyn’s support is very responsive and I have found their customer service to be very good so far.
Do I Need to Purchase the Subscription?
Gardyn comes with a 30-day trial subscription when you purchase the system. There is no need to pre-order the subscription. You can trial it out and see if you want to add it later. If you decide to purchase the subscription later (options of 1 month, 1 year or 2 year ) the subscription cost will be between $29-$39/month. The subscription includes 10 Gardyn yCubes with seeds (these are the plant pods), plant food, etc. and the Kelby AI assistant to help tell you when to feed the plants with plant food, when to thin, trim or harvest the plants. I was very tempted to purchase the subscription but I decided not to. Here are my reasons:
- You get a free 30-day subscription with the purchase of the unit. That will allow the me to trial out the Kelby AI assistant and essentially see if I really need it.
- The App is free and you can continue to control the light and water schedule manually without a subscription.
- Grow plugs and grow baskets can be purchased elsewhere to place your own seeds in. I have tons of seeds at home so I’m going to try this out before purchasing pods from Gardyn. I will link the ones that I purchased below.
- I’m not really sure if I’ll need 10 yCubes per month. I need to see how fast I go through the produce. I believe some of the plants can last several months. In that case, I can always add the subscription later if I feel I need it.
Other Perks
Gardyn has a private Facebook page for their customers. It’s a wonderful community where owners of Gardyn can share tips, tricks or get questions answered by either Gardyn or from others. I set up my System on a Saturday and posted on the group and Gardyn was responding and answering everyone’s questions. So far, I’ve been very happy with the company’s engagement and encouragement for their customers that utilize their system. You can tell they take pride in the product and really want you to enjoy it. It feels like you are working with a family business.
Related Links
- Coupon Code: LittleGardenGirl ($100 off)
- Link to growth basket
- Link to growth medium
- My Indoor Garden Experience – Gardyn Week 1

This piece of writing will help the internet visitors for setting up new weblog or even a weblog from start to end. Lotte Red Tench
I’m glad you’re enjoying this blog. Thank you for commenting!